GCP HTTP(S) load balancing 配下のnginxでクライアントIPを取得する方法
GCP HTTP(S) load balancing の X-Forwarded-For ヘッダは少し変わっているのでメモ。
X-Forwarded-For とクライアントIP
ELBや他のproxyを使って、その配下のサーバにリクエスト元のIPアドレスを伝える際には、X-Forwarded-For ヘッダが使われます。
X-Forwarded-For: $remote_addr
リクエストにすでにX-F-Fヘッダがあった場合は、後ろに追加します。
X-Forwarded-For: $http_x_forwarded_for, $remote_addr
となります。
X-F-Fを受け取ったサーバでは、アクセス元のIPが信用できるIPアドレスまたはIP帯域の場合に、X-F-Fの最後のIPアドレスを、remote_addrとして利用します。
nginxでは ngx_http_realip_module を使います。
set_real_ip_from  192.168.1.0/24;
real_ip_header    X-Forwarded-For;
アクセス元が 192.168.1.0/24 の場合、X-F-Fの最後のIPを利用するという意味です。
GCP HTTP(S) load balancing の X-F-F
本題のGCP HTTP(S) load balancingの場合、X-F-Fは
X-Forwarded-For: 1.2.3.4, 35.186.x.x
となります。この場合、1.2.3.4 が実際のclientのIPアドレス、35.186.x.xがロードバランサーに割り当てたIPアドレスです。また、アクセス元のIPアドレスは、以下の帯域(2017/2/21現在)となります。
130.211.0.0/22
35.191.0.0/16
この状態で、
まず
set_real_ip_from 130.211.0.0/22;
set_real_ip_from 35.191.0.0/16;
real_ip_header   X-Forwarded-For;
という設定をいれると、nginxはアクセス元を信用してX-F-Fの最後の一つをクライアントIPだとします。この場合は 35.186.x.x になってしまい、クライアントIPではありません。
さらに設定が必要になります。
set_real_ip_from 130.211.0.0/22;
set_real_ip_from 35.191.0.0/16;
set_real_ip_from 35.186.x.x;
real_ip_header   X-Forwarded-For;
real_ip_recursive on;
set_real_ip_from 35.186.x.x と real_ip_recursive を追加しました。real_ip_recursiveを有効にすると信用できるIPである限り再帰的にX-F-Fをたどっていきます。set_real_ip_fromにロードバランサーのIPを追加することで、35.186.x.xを信用し、次のIPアドレスをクライアントのIPとして採用ができるようになります。
この設定でようやく$remote_addrが1.2.3.4となりました。
まとめ
IPアドレスの追加の機会はそれほど回数がないので、IPアドレスをバランサーに追加した際にset_real_ip_from の追加を忘れるということは必ず発生するでしょう(発生した)。
アクセスログで正しくIPアドレスが解決ができているかの監視を行ったり、blogに書くなどしてチームに共有する必要があります。
Googleの皆様におかれましては、X-F-Fだけではなく、Akamai/CloudFlareのように True-Client-IP ヘッダの採用をお願いしたく候。True-Client-IPがあれば、ロードバランサーのIPアドレスをnginxのconfに書く必要がなくなり、
set_real_ip_from 130.211.0.0/22;
set_real_ip_from 35.191.0.0/16;
real_ip_header True-Client-IP;
だけとなります。
何卒 :bow:
N秒間だけクエリ実行ログを取りたい
pt-query-digestだったり調査のために、N秒間だけmysqlの全クエリのログを取得したいということはよくありますよね
そんな時はこんなコマンドを使うと簡単に指定の秒数slowlogを切り替えて保存、取得後に元に戻してくれます。
$ slowlog.pl --duration 10 -- --default-extra-file=/hoge/my.cnf -uuser
-- のあとはmysqlコマンドに渡すオプション
ソース
#!/usr/bin/perl

use strict;
use warnings;
use IO::Handle;
use Getopt::Long;
use File::Spec;

sub find_path {
    my $pg = shift;
    my $path;
    for ( split /:/, $ENV{PATH} ) {
        if ( -x "$_/$pg" ) {
            $path = "$_/$pg";
            last;
        }
    }
    $path;
}

my $duration = 10;
Getopt::Long::Configure ("no_ignore_case");
GetOptions(
    "duration=s" => \$duration,
);
my @mysqlopt = @ARGV;
$|=1;

die "duration does not seems numeric" unless $duration =~ m!^\d+$!;
$duration += 0;

my $mysql = find_path('mysql')
    or die "could not find mysql";
my $tmpdir = File::Spec->tmpdir();

my $before = <<'EOF';
SET @cur_long_query_time = @@long_query_time;
SET @cur_slow_query_log_file = @@slow_query_log_file;
SET @cur_slow_query_log = @@slow_query_log;
SET GLOBAL slow_query_log_file = "<TMP_DIR>/slow_query_<DATE>.log";
SET GLOBAL long_query_time = 0;
SET GLOBAL slow_query_log = 1;
EOF

my $after = <<'EOF';
SET GLOBAL long_query_time = @cur_long_query_time;
SET GLOBAL slow_query_log_file = @cur_slow_query_log_file;
SET GLOBAL slow_query_log = @cur_slow_query_log;
EOF

$before =~ s!<TMP_DIR>!$tmpdir!;
my @lt = localtime();
my $date = sprintf('%04d%02d%02d%02d%02d%02d',$lt[5]+1900,$lt[4],$lt[3],$lt[2],$lt[1],$lt[0]);
$before =~ s!<DATE>!$date!;

print STDERR "exec mysql to change long_query_time and slow_query_log_file\n";
print STDERR "save slowlog to $tmpdir/slow_query_$date.log\n";
my $pid = fork;
if ( defined $pid && $pid == 0 ) {
    my $stop = 0;
    local $SIG{INT} = sub {
        $stop++;
    };
    local $SIG{TERM} = sub {
        $stop++;
    };

    open(STDOUT,'>/dev/null');
    open(my $pipe, '|-', $mysql, @mysqlopt, '--sigint-ignore');
    $pipe->autoflush;
    $pipe->print($before);
    for my $i ( 0..$duration ) {
        last if $stop;
        $pipe->print("SELECT 1;\n") if $i % 7 == 0;
        sleep 1;
    }
    $pipe->print($after);
    exit;
}
print STDERR "wait $duration seconds\n";
while (wait == -1) {}
my $exit_code = $?;
if ( $exit_code != 0 ) {
    die sprintf("Error: mysql exited with code: %d", $exit_code >> 8);
}

print STDERR "finished capturing slowlog.\n";
RDSとかAuroraとかよく知りません
libeatmydataを使ってpostfixを劇速にする [用法用量要確認]
libeatmydataというLD_PRELOADを使って、起動したプロセスのfsyncを無効化するライブラリがあったので試してみています。
libeatmydata - disable fsync and SAVE!
fsyncがないと何が嬉しいかというとクラウドのようなIOまわりの環境が弱いところで、安全性は若干犠牲になりますが、パフォーマンスを稼ぐことができるようになります。
まず perlでfsyncを発行してどうなるかstraceをつかって確認してみます。
libeatmydataなし
$ strace perl -MIO::Handle -e 'open(my $fh,">:unix","test.txt"); print $fh "test"; IO::Handle::sync($fh);'
open("test.txt", O_WRONLY|O_CREAT|O_TRUNC, 0666) = 3
fstat(3, {st_mode=S_IFREG|0664, st_size=0, ...}) = 0
fcntl(3, F_SETFD, FD_CLOEXEC)           = 0
write(3, "test", 4)                     = 4
fsync(3)                                = 0
close(3)
libeatmydataあり
$ strace  eatmydata perl -MIO::Handle -e 'open(my $fh,">:unix","test.txt"); print $fh "test"; IO::Handle::sync($fh);'
open("test.txt", O_WRONLY|O_CREAT|O_TRUNC, 0666) = 3
fstat(3, {st_mode=S_IFREG|0664, st_size=0, ...}) = 0
fcntl(3, F_SETFD, FD_CLOEXEC)           = 0
write(3, "test", 4)                     = 4
close(3)
IO::Handle::syncやってるはずなのに、fsyncが表示されていません。
postfixのパフォーマンス改善
某所でPostfixを経由して外部の配信サービスにメールを転送しているサーバがあり、このIO負荷が高いのが課題となってました。

一斉メール送信のタイミングでかなりIO-waitが上がっています。
postfixの構成
がわかりやすい。
postfixはいくつかのプロセスに分かれて動作します。メールを受けるときは、smtpdのプロセスが送信者からデータを受け取り、cleanupというプロセスに渡し、cleanupプロセスが実際にdiskに書き込む流れになっています。このcleanupプロセスがメールをdiskに書き込む時にfsyncを行うので、ここだけlibeatmydataを入れ込めば良いはず。
そこで /usr/libexec/postfix に cleanup_nosync というファイルを用意
#!/bin/sh
exec /usr/bin/eatmydata /usr/libexec/postfix/cleanup $*
master.cfを変更する
cleanup unix n - n - 0 cleanup_nosync #最後だけ変更
postfixをreloadすれば設定が反映されます。
効果の確認
以上の設定をいれたサーバにて、受け取ったメールをすべて捨てるサーバ宛に大量にメールを送信して確認しました。
まず libeatmydata 適用前
$ vmstat 1
procs -----------memory---------- ---swap-- -----io---- --system-- -----cpu-----
 r  b   swpd   free   buff  cache   si   so    bi    bo   in   cs us sy id wa st
 1  0      0 2420292 249248 1677904    0    0     0    41    2    0  4  0 95  1  0
 1  0      0 2420284 249248 1677904    0    0     0     0 1264  325 23  2 74  0  0
 1  3      0 2387640 249248 1677904    0    0     0  1180 2660 3530 21  3 64 11  0
 0  0      0 2386628 249248 1677916    0    0     0  4356 5434 11669  9  4 77 10  0
 0  5      0 2385868 249248 1677956    0    0     0  3620 4632 10255 13  3 75  9  0
 0  0      0 2385844 249248 1678004    0    0     0  2792 4294 12083  4  4 88  4  0
 0  0      0 2385596 249248 1678052    0    0     0  3724 4772 13095  3  4 88  4  0
 0  0      0 2386200 249248 1678116    0    0     0  3408 4452 11660  4  4 86  6  0
 0  0      0 2387968 249248 1678136    0    0     0  2908 4327 10611  4  3 82 11  0
 0  0      0 2390704 249248 1678200    0    0     0  4724 5314 13459  4  5 86  6  0
 0  0      0 2388580 249248 1678240    0    0     0  5212 5520 13300  4  5 85  6  0
 3  1      0 2388208 249248 1678292    0    0     0  4716 5934 13486  4  5 86  6  0
 0  1      0 2387960 249248 1678344    0    0     0  4608 5947 13964  4  4 85  7  0
 0  1      0 2386720 249248 1678392    0    0     0  3164 4561 10527  3  4 81 11  0
 0  0      0 2386464 249248 1678424    0    0     0  4544 5555 13150  4  4 86  6  0
 0  0      0 2386092 249248 1678472    0    0     0  5052 6135 13801  4  4 85  7  0
 0  1      0 2387456 249248 1678524    0    0     0  5232 5905 13530  5  5 84  7  0
 0  0      0 2402424 249248 1678560    0    0     0   920 1203 2561  1  1 97  2  0
 0  0      0 2402424 249248 1678560    0    0     0     8  160  300  0  0 100  0  0
iowaitが5-10%前後でています。
libeatmydata 適用後
$ vmstat 1
procs -----------memory---------- ---swap-- -----io---- --system-- -----cpu-----
 r  b   swpd   free   buff  cache   si   so    bi    bo   in   cs us sy id wa st
 0  0      0 2421320 249256 1678660    0    0     0     8  266  474  0  0 100  0  0
 0  0      0 2391500 249256 1678660    0    0     0     0 2248 4025  5  2 93  0  0
 0  0      0 2391212 249256 1678652    0    0     0     0 6185 13856  4  4 92  0  0
 0  0      0 2390824 249256 1678976    0    0     0     0 6106 13950  4  4 92  0  0
 0  0      0 2391552 249256 1678804    0    0     0     0 5932 13648  4  4 92  0  0
 0  0      0 2388644 249256 1678868    0    0     0   104 5901 13003  5  5 91  0  0
 0  0      0 2389644 249256 1678896    0    0     0     0 5552 13448  4  4 92  0  0
 4  0      0 2389280 249256 1678936    0    0     0     0 5912 13921  4  4 93  0  0
 5  0      0 2391024 249256 1679004    0    0     0     0 6185 13774  4  4 93  0  0
 1  0      0 2390528 249256 1679056    0    0     0     0 5848 13187  4  4 92  0  0
 0  0      0 2390404 249256 1679108    0    0     0   116 6250 12982  5  4 91  0  0
 0  0      0 2387496 249256 1679156    0    0     0    12 6977 13495  6  6 89  0  0
 0  0      0 2389112 249256 1679176    0    0     0     0 6074 14039  4  4 92  0  0
 0  0      0 2387616 249256 1679236    0    0     0     0 5966 13956  4  4 92  0  0
 0  0      0 2403196 249256 1679296    0    0     0     0 1412 2950  1  1 99  0  0
 0  0      0 2403444 249256 1679304    0    0     0   136  217  450  0  0 100  0  0
iowaitは常に 0。圧倒的な効果がでました。
データの安全性対策
念のため、1秒間隔でdiskへのsyncが行われるように設定しました。
$ sudo sysctl -w vm.dirty_writeback_centisecs=100
productionへの適用

IO-waitが消え、送信にかかる時間も短くなりました。やった!
Ruby 2.4.0 preview3 での pico_http_parser のベンチマーク
Ruby 2.4.0-preview3 で Hash まわりの改善があったということで、pico_http_parser のベンチマークを取ってみた
GitHub - kazeburo/pico_http_parser: Fast HTTP Parser using picohttpparser
ベンチマークは。pico_http_parser/benchmark 以下のscript。結果としては1.5倍程度パフォーマンスが上がっていることが観測できました。リアルなアプリケーションでも速度アップが見込めるんじゃないかなと思います。素晴らしい

ヘッダが0個の時だけパフォーマンスが悪くなるのは、Hashの要素数が少ないときの最適化が変わったのかなと予想
最近の Plack のパフォーマンス改善まとめ 2015年11月版
OSS活動の成果発表のお時間です。
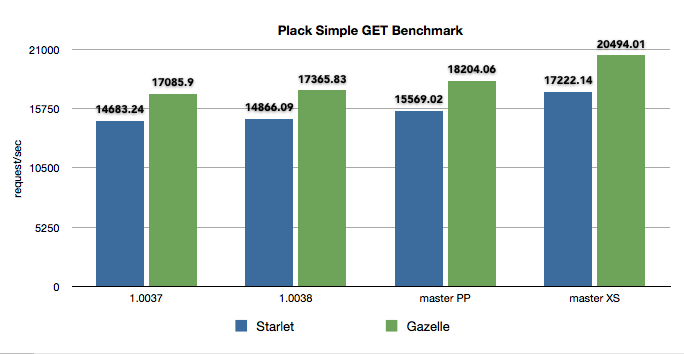
Plackの 1.0038と2015年11月27日時点のmasterにはPlack::Request、Plack::Responseのパフォーマンスをあげる変更が入ってます。その紹介とベンチマークです。
Plack 1.0038 で HTTP::Headers::Fast 0.20 につけた flatten メソッドを使うようになってます。Plack::Response->finalizeのパフォーマンス向上が期待できます。
こちらはまだmasterにmergeされた状態。リリースはされてない。POSTリクエストのパースにHTTP::Bodyではなく、HTTP::Entitiy::Parserを使い、パラメータのパースに WWW::Form::UrlEncodedを使うようになっています。
HTTP::Entity::Parserは tokuhirom の pullreq をベースに作ったモジュールで chansen の HTTP::MultiPartParserをuploadデータの解析に利用しています。GETのクエリーパラメータなどの文字列をパースする WWW::Form::UrlEncoded は XS版も用意され、インストールするだけで長いクエリパラメータの処理が超高速になります。
ベンチマーク
以下のような psgi を用意して Plackの 1.0037、10038、そしてmasterでベンチマークを行いました。
use Plack::Builder;
use Plack::Request;
my $length = 4000;
my $body = 'x'x$length;
builder {
    enable 'AccessLog', logger => sub { };
    sub {
        my $env = shift;
        my $req = Plack::Request->new($env);
        my @params = $req->param('foo');
        my $res = $req->new_response(200);
        $res->content_type('text/plain');
        $res->content_length($length);
        $res->body($body);
        $res->finilize;
    }
};
ベンチマークを行ったサーバはgcpの12コアのサーバです。下記のsysctlのチューニングを行いました
sudo sysctl -w net.core.netdev_max_backlog=8192
sudo sysctl -w net.core.somaxconn=32768
sudo sysctl -w net.ipv4.tcp_tw_recycle=1
sudo sysctl -w net.ipv4.tcp_tw_reuse=1
perlは5.20.3、Starletは 0.28、Gazelleは0.40です。
起動オプションは Starlet、Gazelleともに同じです。
plackup -s (Starlet|Gazelle) -E production --max-workers=10 --max-reqs-per-child=5000000 -a app.psgi
ベンチマークは wrk にて取りました
./wrk -t 2 -c 8 -d 30 'http://localhost:5000/foo?foo=bar&bar=baz&q=HTTP%3A%3ARequest%3A%3ACommon&ie=UTF-8&sourceid=chrome'
結果

1.0037から1.0038は微増。1.0038からmasterは PP版で5%ほどのパフォーマンス向上、XSになると15-20%のパフォーマンス向上となりました。WWW::Form::UrlEncoded::XSを使うと実際のアプリケーションでも差異がでるかもしれません。
以下wrkコマンドの結果
Gazelle + Plack 1.0037
$ ./wrk -t 2 -c 8 -d 30 'http://localhost:5000/foo?foo=bar&bar=baz&q=HTTP%3A%3ARequest%3A%3ACommon&ie=UTF-8&sourceid=chrome'
Running 30s test @ http://localhost:5000/foo?foo=bar&bar=baz&q=HTTP%3A%3ARequest%3A%3ACommon&ie=UTF-8&sourceid=chrome
  2 threads and 8 connections
  Thread Stats   Avg      Stdev     Max   +/- Stdev
    Latency   375.59us  187.59us   9.30ms   98.41%
    Req/Sec     8.58k     0.93k   12.50k    91.67%
  512632 requests in 30.00s, 1.98GB read
Requests/sec:  17085.90
Transfer/sec:     67.46MB
Gazelle + Plack 1.0038
$ ./wrk -t 2 -c 8 -d 30 'http://localhost:5000/foo?foo=bar&bar=baz&q=HTTP%3A%3ARequest%3A%3ACommon&ie=UTF-8&sourceid=chrome'
Running 30s test @ http://localhost:5000/foo?foo=bar&bar=baz&q=HTTP%3A%3ARequest%3A%3ACommon&ie=UTF-8&sourceid=chrome
  2 threads and 8 connections
  Thread Stats   Avg      Stdev     Max   +/- Stdev
    Latency   369.07us  188.53us   8.06ms   98.86%
    Req/Sec     8.73k   686.61    12.24k    89.50%
  520994 requests in 30.00s, 2.01GB read
Requests/sec:  17365.83
Transfer/sec:     68.56MB
Gazelle + Plack master + WWW::Form::UrlEncoded::PP
$ ./wrk -t 2 -c 8 -d 30 'http://localhost:5000/foo?foo=bar&bar=baz&q=HTTP%3A%3ARequest%3A%3ACommon&ie=UTF-8&sourceid=chrome'
Running 30s test @ http://localhost:5000/foo?foo=bar&bar=baz&q=HTTP%3A%3ARequest%3A%3ACommon&ie=UTF-8&sourceid=chrome
  2 threads and 8 connections
  Thread Stats   Avg      Stdev     Max   +/- Stdev
    Latency   347.94us  210.95us  10.08ms   98.87%
    Req/Sec     9.15k     0.90k   13.45k    91.33%
  546160 requests in 30.00s, 2.11GB read
Requests/sec:  18204.06
Transfer/sec:     71.87MB
Gazelle + Plack master + WWW::Form::UrlEncoded::XS
$ ./wrk -t 2 -c 8 -d 30 'http://localhost:5000/foo?foo=bar&bar=baz&q=HTTP%3A%3ARequest%3A%3ACommon&ie=UTF-8&sourceid=chrome'
Running 30s test @ http://localhost:5000/foo?foo=bar&bar=baz&q=HTTP%3A%3ARequest%3A%3ACommon&ie=UTF-8&sourceid=chrome
  2 threads and 8 connections
  Thread Stats   Avg      Stdev     Max   +/- Stdev
    Latency   297.28us  220.10us  10.23ms   99.33%
    Req/Sec    10.30k     0.95k   14.73k    92.00%
  614871 requests in 30.00s, 2.37GB read
Requests/sec:  20494.01
Transfer/sec:     80.91MB
Starlet + Plack 1.0037
$ ./wrk -t 2 -c 8 -d 30 'http://localhost:5000/foo?foo=bar&bar=baz&q=HTTP%3A%3ARequest%3A%3ACommon&ie=UTF-8&sourceid=chrome'
Running 30s test @ http://localhost:5000/foo?foo=bar&bar=baz&q=HTTP%3A%3ARequest%3A%3ACommon&ie=UTF-8&sourceid=chrome
  2 threads and 8 connections
  Thread Stats   Avg      Stdev     Max   +/- Stdev
    Latency   450.54us  175.99us   7.97ms   96.39%
    Req/Sec     7.38k     0.90k   11.11k    92.33%
  440509 requests in 30.00s, 1.71GB read
Requests/sec:  14683.24
Transfer/sec:     58.20MB
Starlet + Plack 1.0038
$ ./wrk -t 2 -c 8 -d 30 'http://localhost:5000/foo?foo=bar&bar=baz&q=HTTP%3A%3ARequest%3A%3ACommon&ie=UTF-8&sourceid=chrome'
Running 30s test @ http://localhost:5000/foo?foo=bar&bar=baz&q=HTTP%3A%3ARequest%3A%3ACommon&ie=UTF-8&sourceid=chrome
  2 threads and 8 connections
  Thread Stats   Avg      Stdev     Max   +/- Stdev
    Latency   443.11us  175.54us   7.51ms   96.42%
    Req/Sec     7.47k     0.91k   11.22k    92.17%
  446088 requests in 30.01s, 1.73GB read
Requests/sec:  14866.09
Transfer/sec:     58.92MB
Starlet + Plack master + WWW::Form::UrlEncoded::PP
$ ./wrk -t 2 -c 8 -d 30 'http://localhost:5000/foo?foo=bar&bar=baz&q=HTTP%3A%3ARequest%3A%3ACommon&ie=UTF-8&sourceid=chrome'
Running 30s test @ http://localhost:5000/foo?foo=bar&bar=baz&q=HTTP%3A%3ARequest%3A%3ACommon&ie=UTF-8&sourceid=chrome
  2 threads and 8 connections
  Thread Stats   Avg      Stdev     Max   +/- Stdev
    Latency   420.69us  177.07us   6.51ms   98.15%
    Req/Sec     7.82k   786.01    11.52k    91.33%
  467110 requests in 30.00s, 1.81GB read
Requests/sec:  15569.02
Transfer/sec:     61.71MB
Starlet + Plack master + WWW::Form::UrlEncoded::XS
$ ./wrk -t 2 -c 8 -d 30 'http://localhost:5000/foo?foo=bar&bar=baz&q=HTTP%3A%3ARequest%3A%3ACommon&ie=UTF-8&sourceid=chrome'
Running 30s test @ http://localhost:5000/foo?foo=bar&bar=baz&q=HTTP%3A%3ARequest%3A%3ACommon&ie=UTF-8&sourceid=chrome
  2 threads and 8 connections
  Thread Stats   Avg      Stdev     Max   +/- Stdev
    Latency   373.80us  193.16us   6.98ms   98.96%
    Req/Sec     8.65k   785.91    12.77k    95.00%
  516923 requests in 30.02s, 2.00GB read
Requests/sec:  17222.14
Transfer/sec:     68.26MB
crontabのsyntax checkをTravis-CIで行う
crontabファイルをrespositoryで管理していますが、テストができてなかったので、それを解消すべくTravis-CIでやってみました。
.travis.yml
language: ruby
script:
  - cat crontab.ok.txt | crontab
  - cat crontab.fail.txt | crontab
travisで実行された様子

意外なことに簡単に動いた。
Travisはcrontabが登録されても実際にはコマンドが動かない、はず。
songmuさんのParse::Crontabも非常に良いのですが、今のプロジェクトはPerlのプロジェクトではないので若干入れにくい。
参考